

Directions

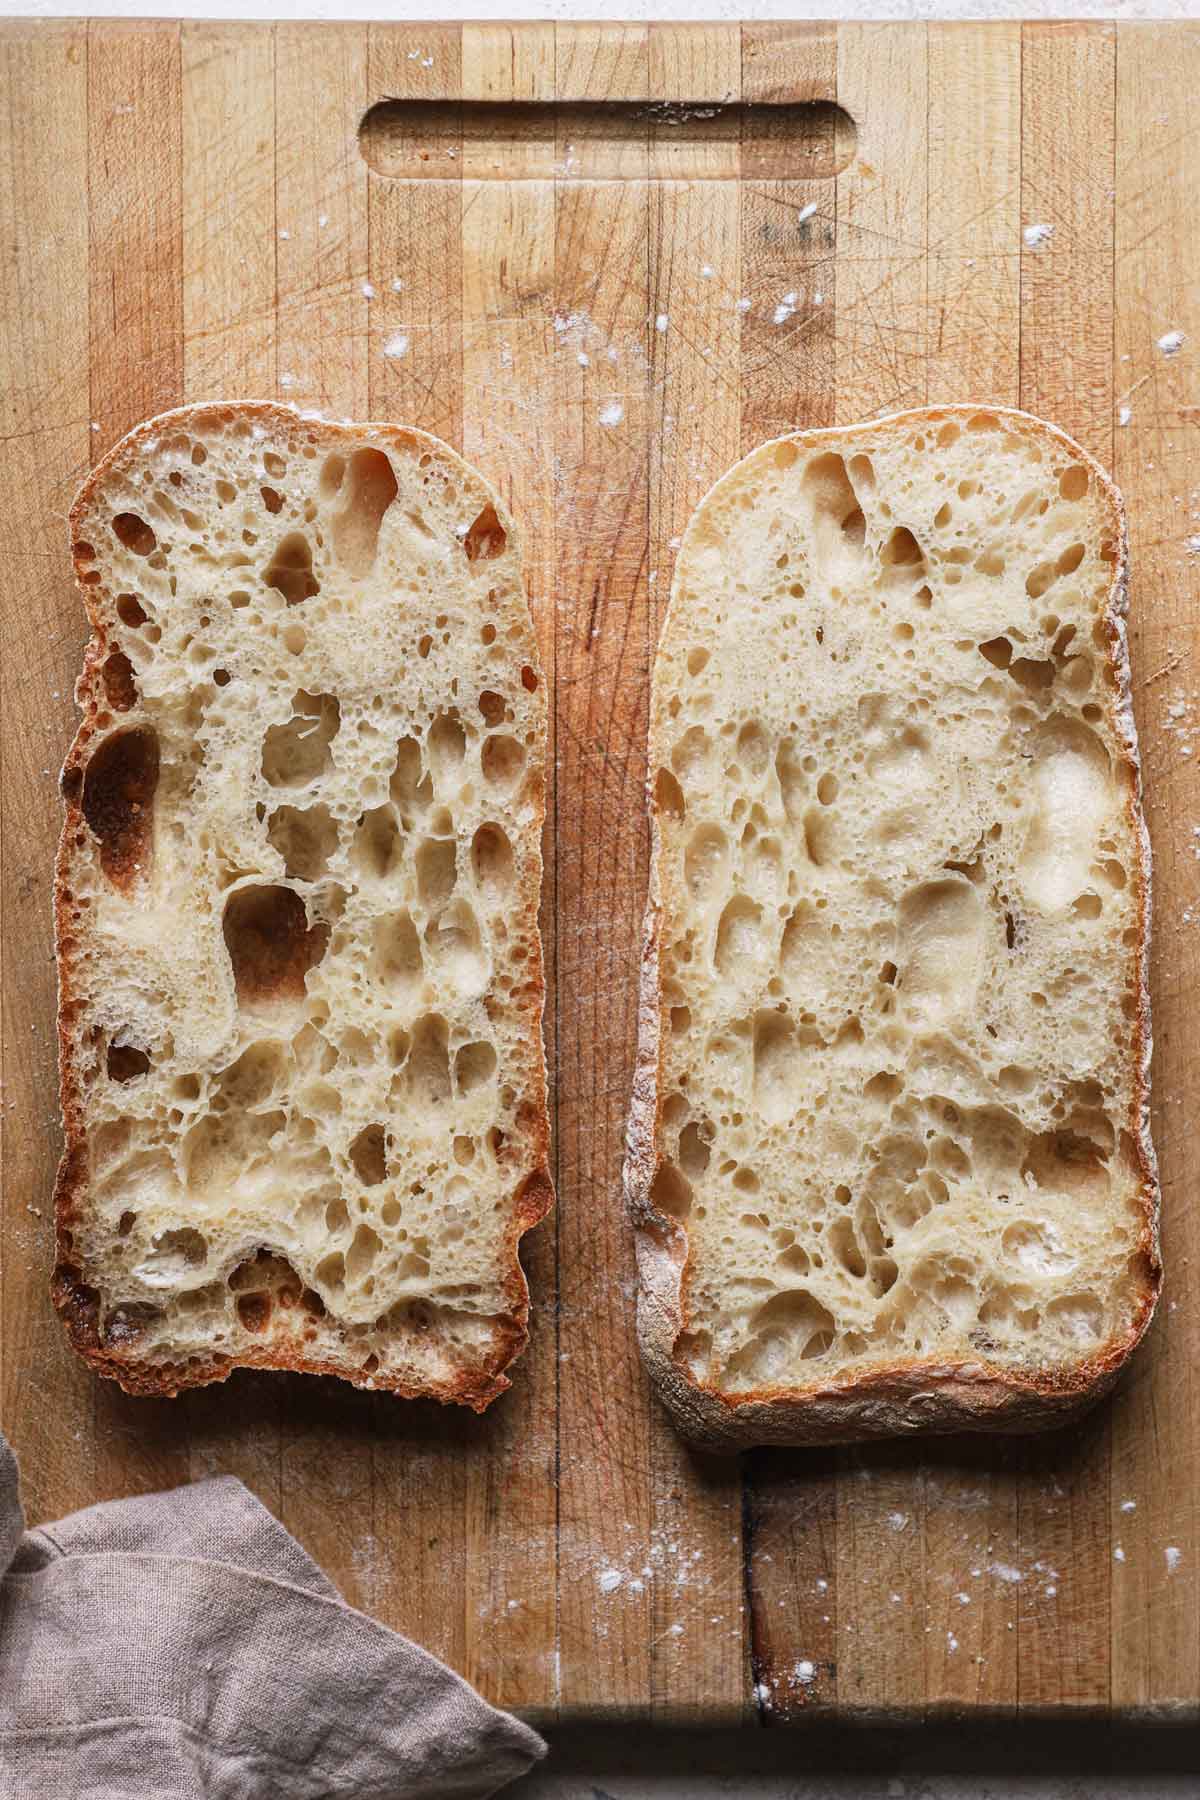
This simple ciabatta bread recipe ends in stunning rustic loaves of traditional Italian bread, with its completely chewy inside texture studded with these splendidly massive air bubbles. It’s virtually begging to be dipped into your favourite soup or stew.

I’ve such a love affair with baking do-it-yourself bread; the scent of yeast and contemporary, rising dough has such a relaxing impact.
It makes me wish to curl up on a lined wrap-around porch and skim throughout a rainstorm.
Why You’re Going to Love It
I’ve lengthy cherished ciabatta bread for its chewy exterior and comfortable crumb speckled with air holes. It’s the proper bread for dunking into soup, slicing horizontally and making a sandwich, changing to garlic bread, or for merely slathering with butter and consuming till your coronary heart’s content material.
This recipe will not be difficult, though it does take a bit of little bit of planning forward. Precise hands-on time is lower than an hour in whole, and the dough may be very forgiving. Let’s dive into the small print of the recipe!
Substances Overview
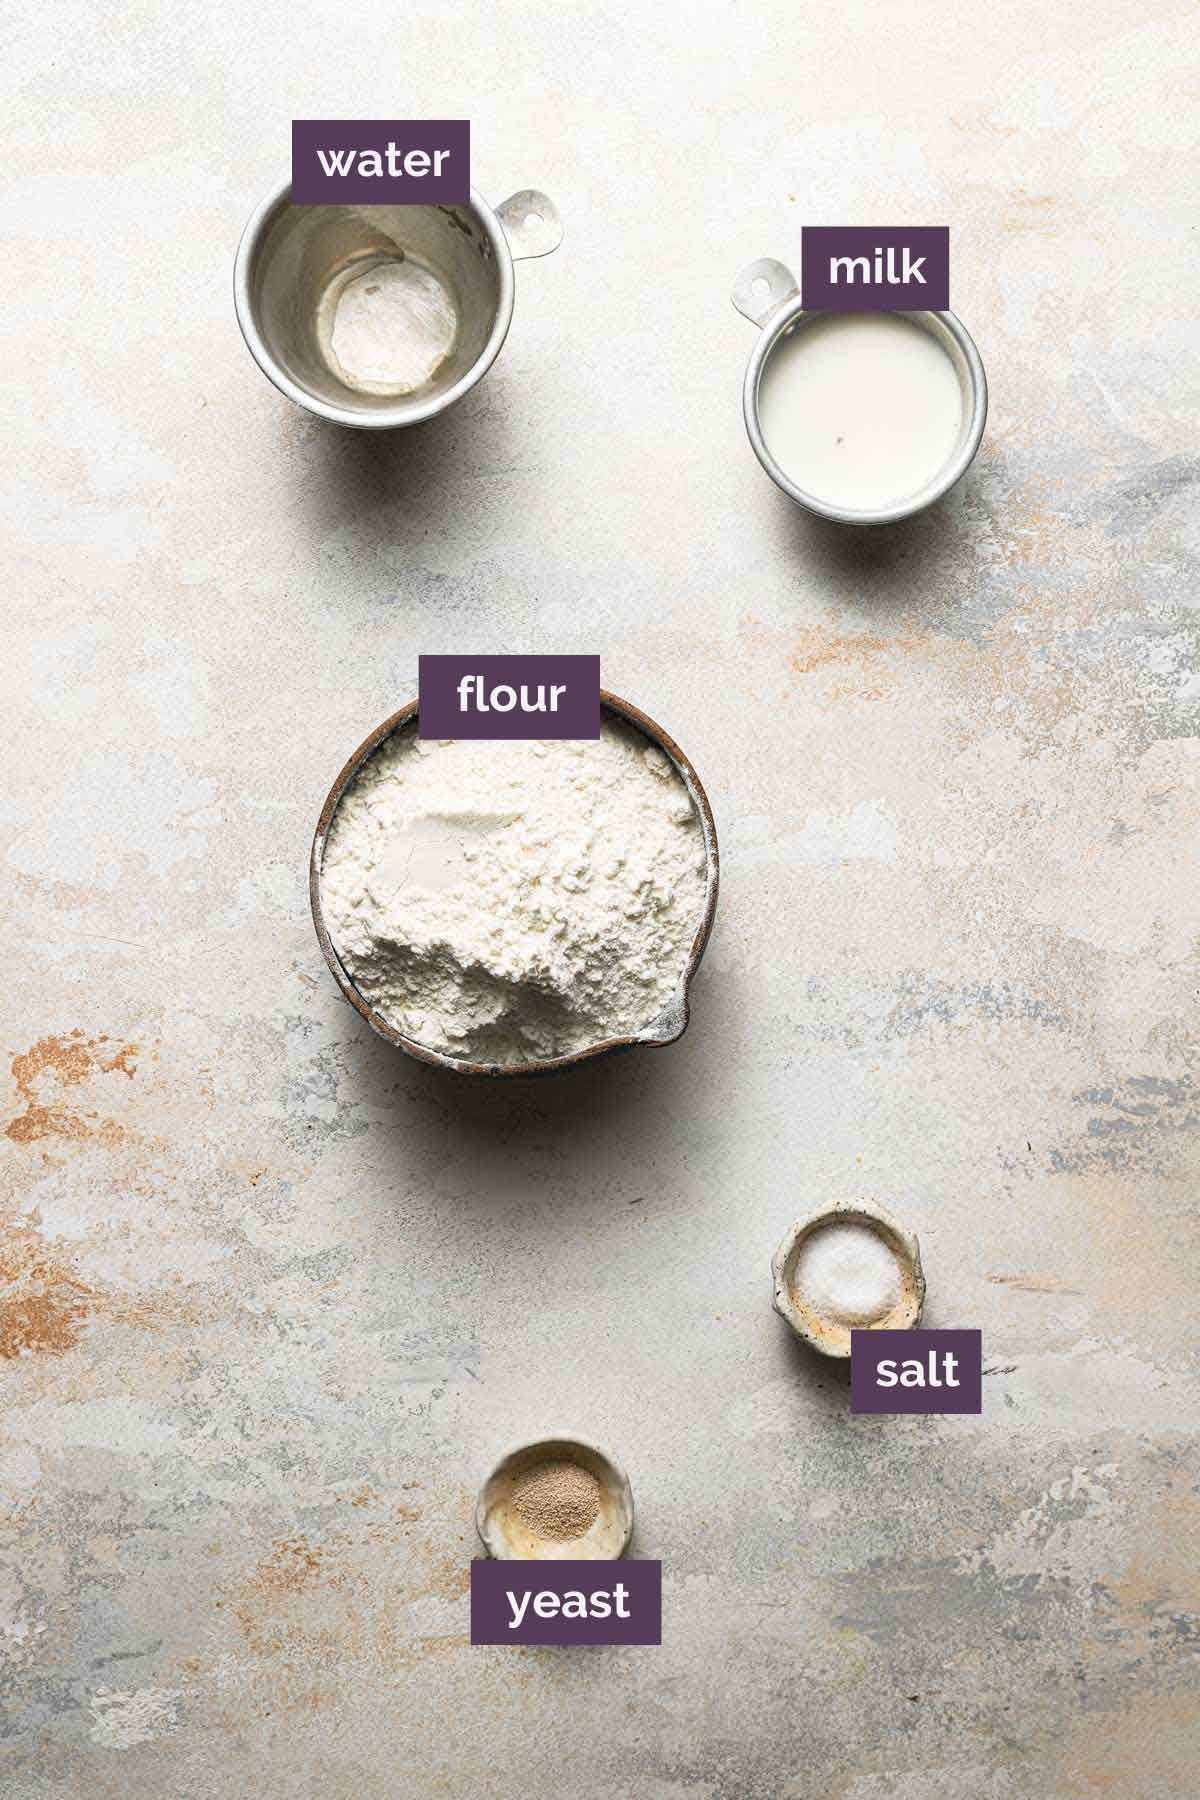
The great thing about this bread is its extremely simplistic and rustic nature. Under is a fast overview of the components we use with some notes on them and substitutions you might be questioning about:
- Flour – For this recipe, we use all-purpose flour. It has the proper quantity of protein to provide a ciabatta with an ideal rise and ethereal texture. Substituting bread flour will lead to a denser, chewier, and fewer ethereal loaf of bread.
- Yeast – We use instantaneous yeast, which is definitely combined into dry components. If you should substitute lively dry yeast, remember that you’ll want to activate it in each the sponge and the dough by first guaranteeing that the water is heat (100 to 110 levels F), sprinkling the yeast over the water, giving it a fast stir, after which ready 10 or quarter-hour, till it turns into foamy. At that time, proceed with the remainder of the recipe.
- Water – An important element! Ciabatta dough is taken into account a high-hydration dough due to the ratio of water to flour. For that reason, you’ll discover that it’s reasonably sticky and a really moist dough. We’ll discuss under about how finest to deal with the dough.
- Salt – Not solely does this assist to steadiness flavors in bread, however it additionally aids in coloring the crust, controlling the rise, and growing gluten. Don’t depart it out!
- Milk – A protein in milk helps to regulate the scale of the air bubbles within the bread. With out it, the holes are bigger, which doesn’t depart as a lot bread construction. The very best milk is complete or 2%, however 1% will also be utilized in a pinch. You can even substitute 2 tablespoons of nonfat milk powder (improve the water within the dough step to 1 cup).
Ciabatta Dough: Two Elements
The dough for ciabatta bread is made in two levels:
- Sponge (or Biga) – This primary combination is ready the day earlier than you propose to bake the bread. It’s comprised of simply flour, yeast, and water. This fermented sponge is what provides the ciabatta its superb, barely tangy taste.
- Dough – The subsequent day, you’ll combine collectively the dough, which can embrace the sponge that has been sitting in a single day.
Find out how to Make the Dough
Let’s stroll by way of how the dough comes collectively:
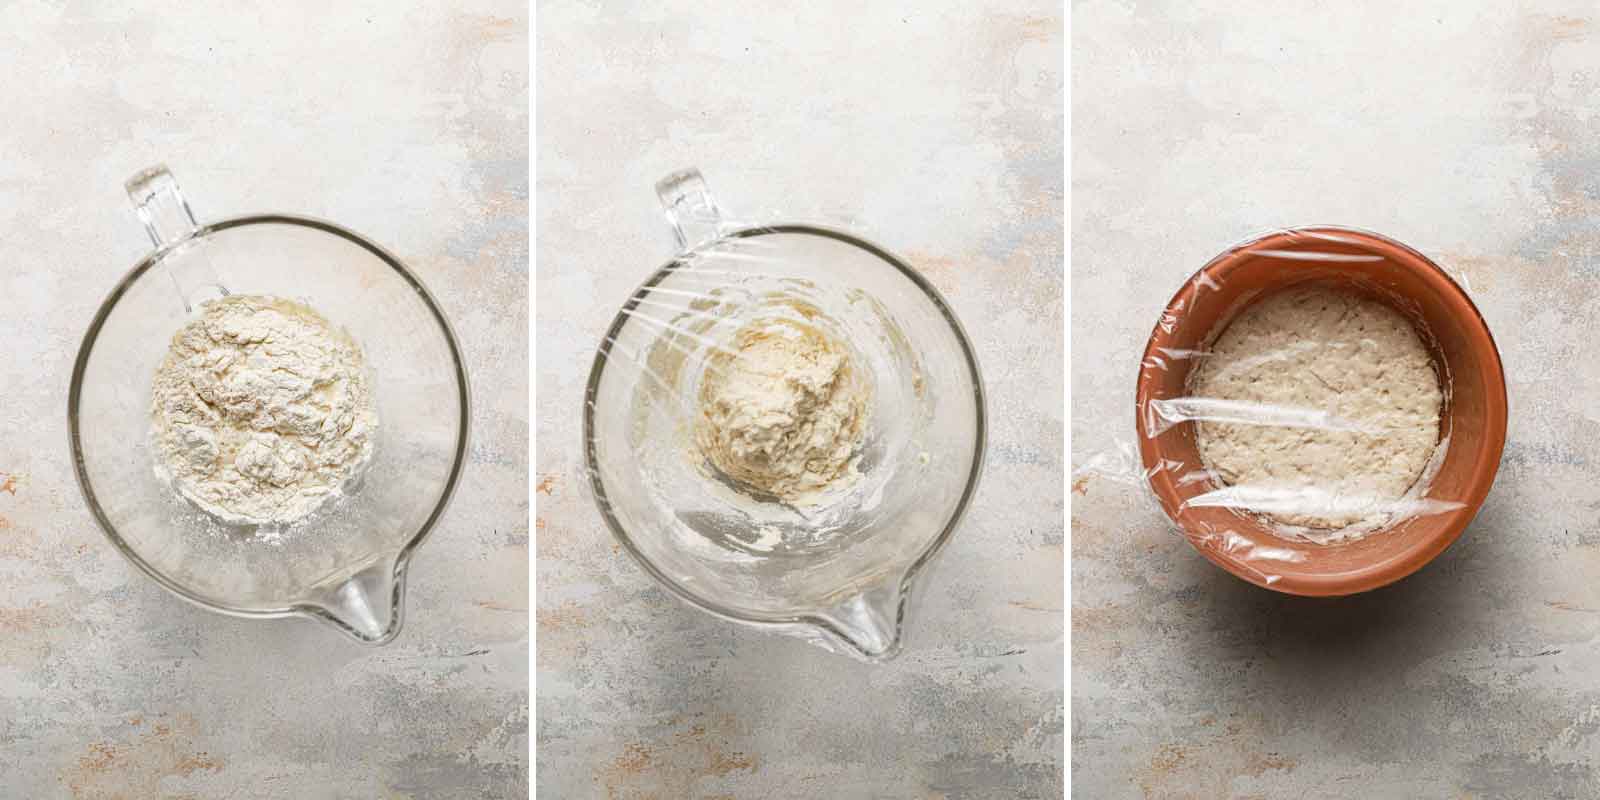
Step #1: Make the Sponge – You’ll combine collectively the flour, yeast, and water with a wood spoon, cowl the bowl with plastic wrap, and let sit in a single day or for as much as 24 hours.
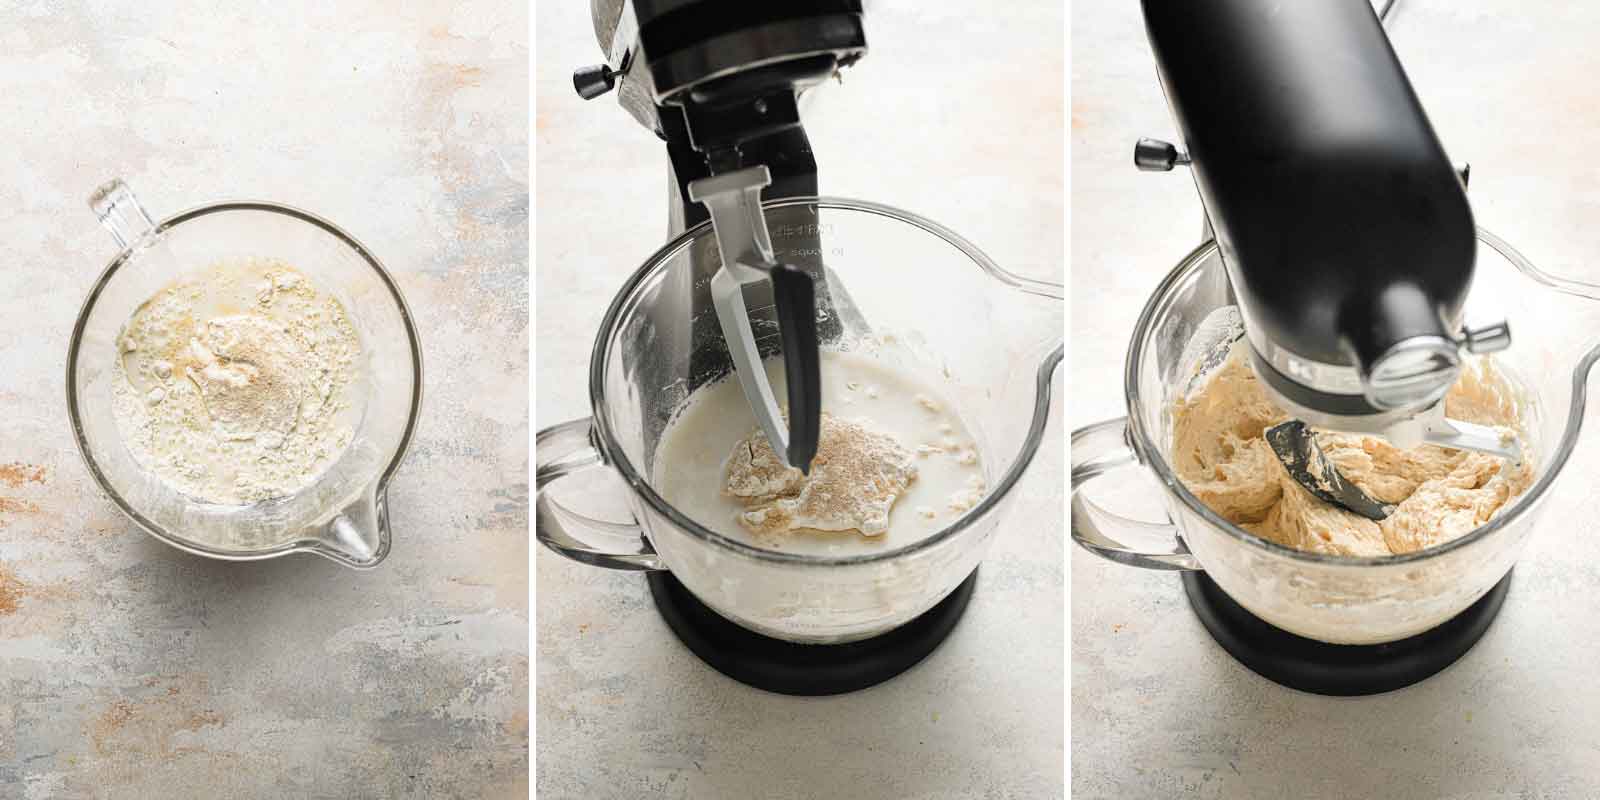
Step #2: Combine the Dough – Add the sponge and the entire dough components to a stand mixer and blend with the paddle attachment till it turns into a uniform mass and pulls away from the perimeters of the bowl. Swap to the dough hook and knead till the dough is shiny and easy (about 10 minutes).
Step #3: Rise – Switch the dough to a bowl, cowl with plastic wrap, and set at room temperature till doubled in measurement (about 1 hour).
Folding the Dough
This folding course of could appear tedious, however it’s an integral a part of reaching these picture-perfect air bubbles! Right here is the way you do it:
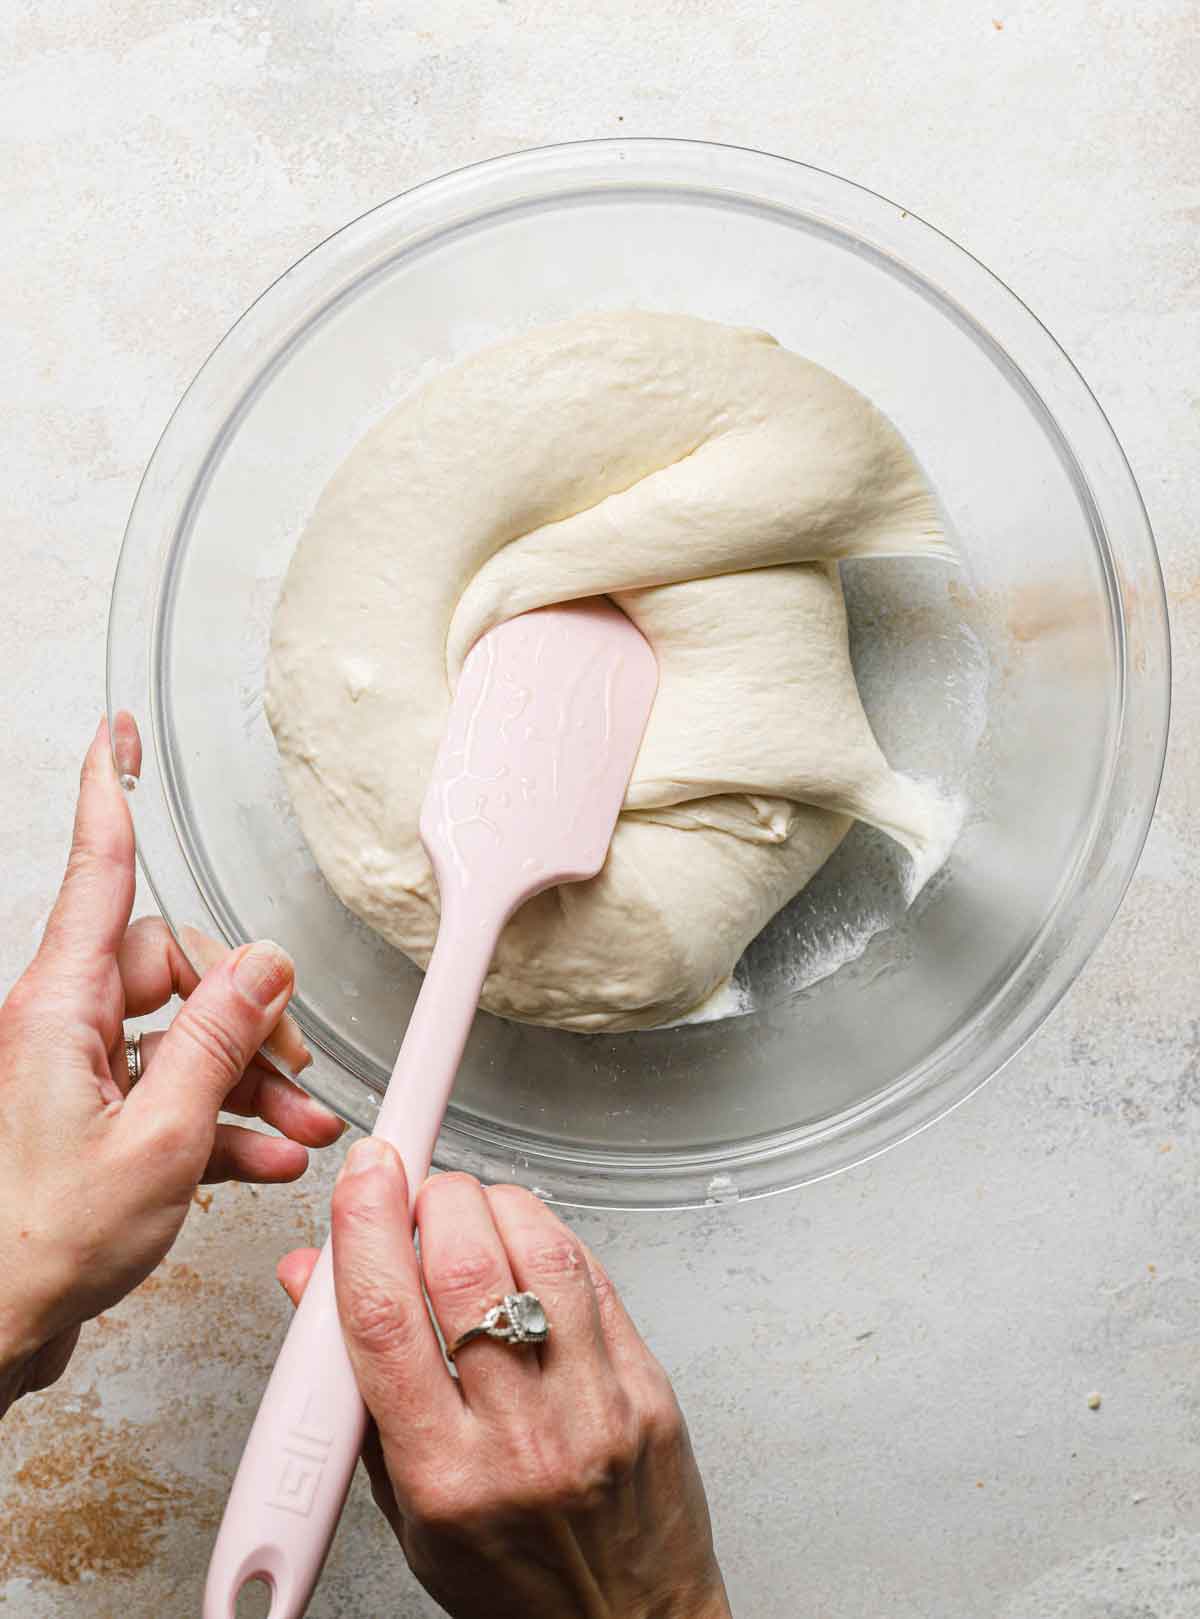
Make certain your spatula or bowl scraper is sprayed with cooking spray (or rub it with olive oil).
Then elevate the tip of the dough over itself towards the center, rotate the bowl 90 levels, repeat, after which six extra occasions, for a complete of 8 occasions.
Cowl the bowl with plastic wrap, let relaxation/rise for half-hour, then repeat the very same folding course of once more.
As soon as carried out, cowl the dough as soon as extra and permit to double in measurement earlier than continuing with shaping.
Shaping the Ciabatta
The ultimate shaping of the ciabatta earlier than baking is what provides the bread its attribute “slipper” form, from which its identify originates (“ciabatta” means slipper in Italian; the bread was given this identify as a result of its form resembles a well-worn slipper).
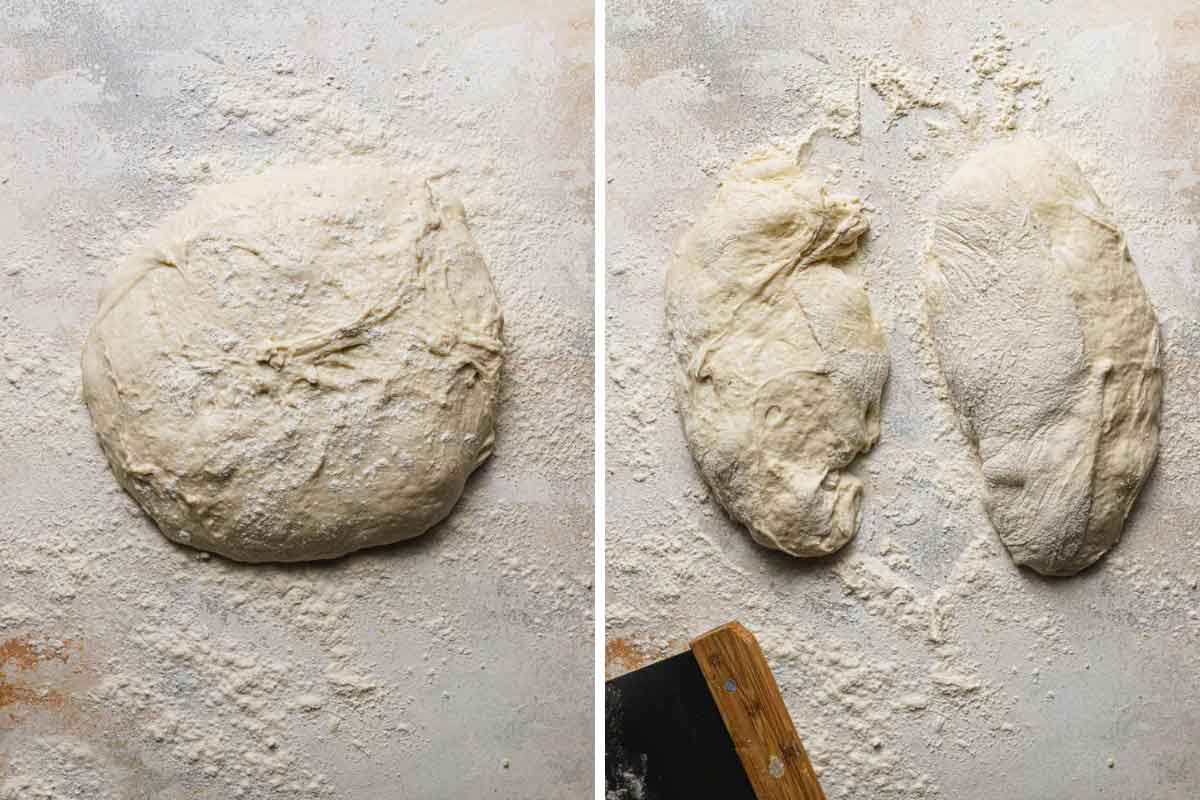
Shaping Step #1: Flip the dough out onto a floured floor gently (so it doesn’t fully deflate), mud it with flour, and divide in half with a bench scraper.
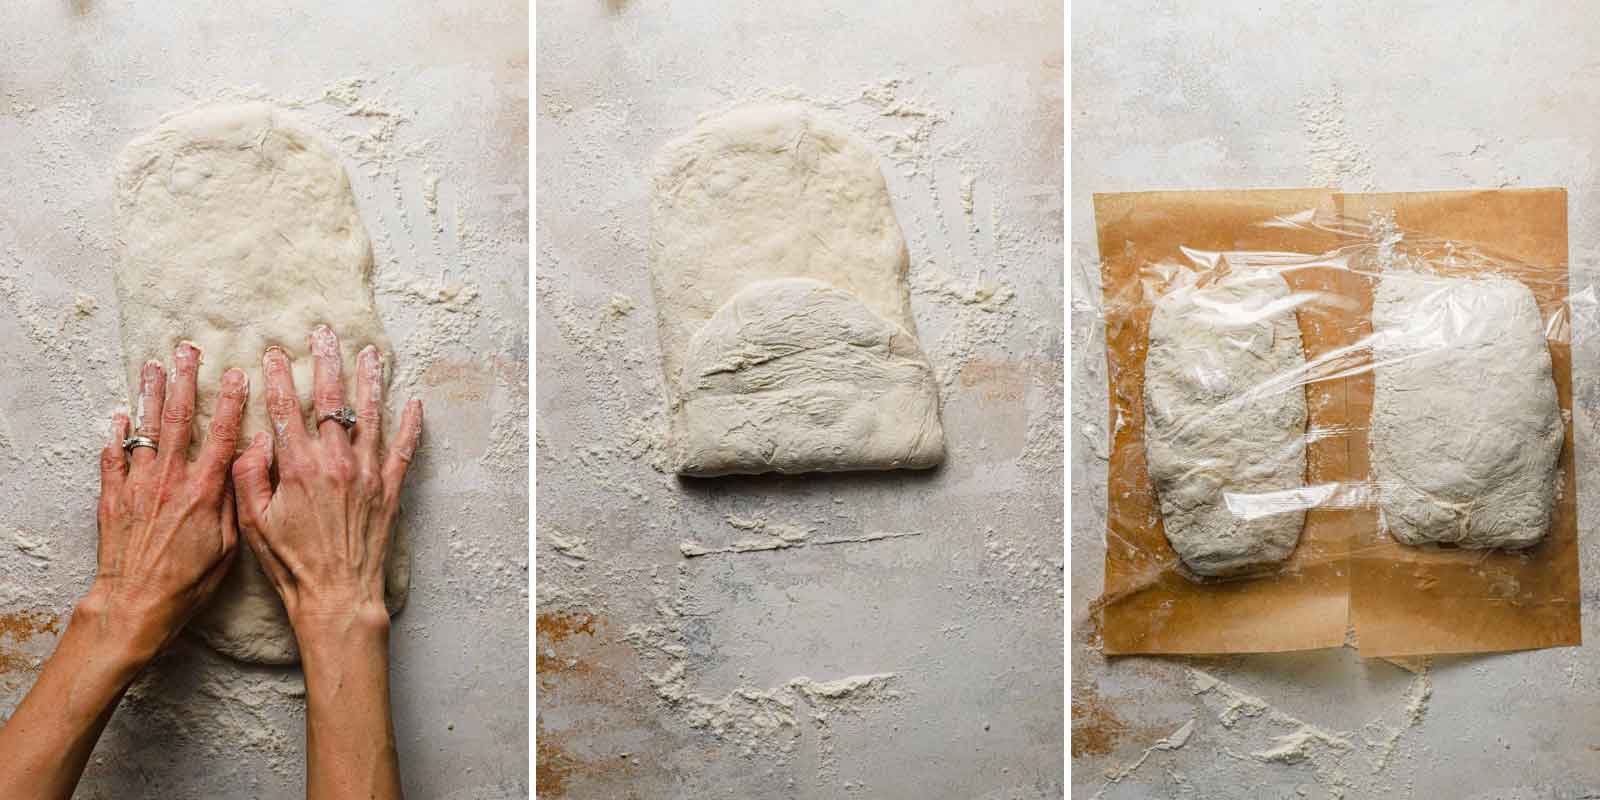
Shaping Step #2: Place one piece of dough cut-side-up and dirt with flour, then utilizing fingertips, gently press the dough right into a 12×6-inch rectangle. Fold one finish of the dough in direction of the center, and fold the opposite finish excessive of the primary fold (as you’d fold a letter in thirds). Repeat with the second loaf of dough.
Shaping Step #3: Switch every loaf to an oblong piece of parchment that has been dusted with flour. Mud the tops of the loaves with flour, cowl with plastic wrap, and permit to take a seat for half-hour.
Baking the Bread
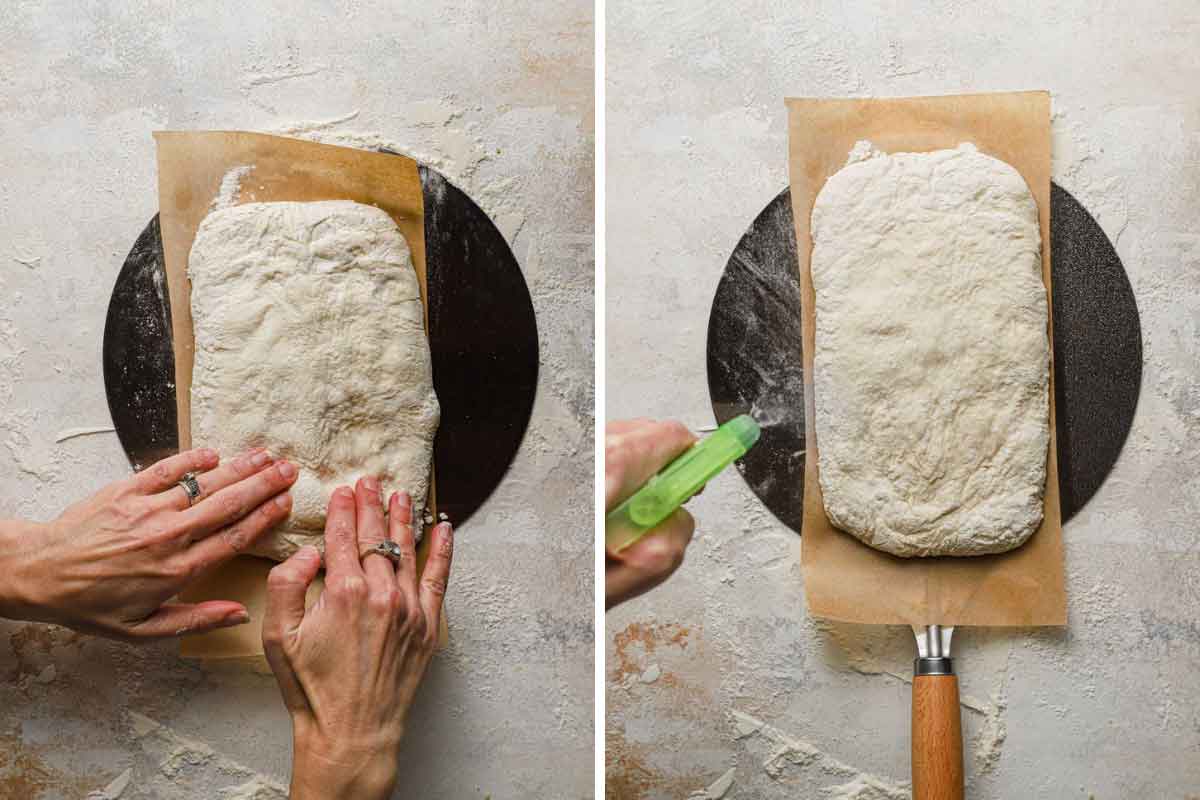
When the half-hour is up, you’ll slide the parchment items with the loaves onto a pizza peel. Use floured fingertips to poke the floor throughout to create a ten×6-inch rectangle. Flippantly spritz the loaves with water and slide the loaves onto a preheated pizza stone within the oven (you can too use an inverted baking pan, see notes under).
Spray with water twice extra throughout the first 5 minutes of baking, then proceed baking till the interior temperature registers 210 levels F.
Recipe Notes and FAQ
A couple of notes and the solutions the some generally requested questions:
- Gear – To take advantage of this recipe, I like to recommend utilizing the next items of apparatus: stand mixer / bowl scraper / bench scraper / baking stone / parchment paper / pizza peel / spray bottle / digital instant-read thermometer / wire cooling rack
- Yeast – When you substitute lively yeast as an alternative of instantaneous yeast, you will want to remember to activate it in heat water first, as an alternative of merely mixing it with the flour and room temperature water.
- Milk – Complete milk is most popular, however 2% or 1% will also be used. You can even substitute 2 tablespoons of nonfat milk powder (improve water in dough to 1 cup).
- Stand Mixer – Because of the excessive hydration of this dough and the way sticky it’s, a stand mixer is necessary for having the ability to handle the dough correctly.
- Dealing with the Dough – Needless to say this dough may be very moist and sticky; the important thing to working it nicely is to take action shortly and gently. An excessive amount of heavy-handling of the dough will lead to flat, powerful loaves. Use a bowl scraper when doable and if you should use your fingers, make sure that they’re well-floured.
- Baking Stone – When you do not need a baking stone, you should use a baking sheet that’s turned upside on the bottom oven rack and preheated as directed.
- Making Ciabatta Rolls – To make rolls, use a bench scrape to divide every loaf into 6 or 8 even-sized parts. Separate them a bit on the parchment sheet in order that they aren’t touching.
- Storage – The bread may be stored at room temperature, wrapped in foil, for as much as 2 days.
- To Reheat the Bread – Hold it wrapped in foil and place in a 450-degree oven for six to eight minutes.
- Freezing the Bread – Wrap tightly in foil, then place in a ziploc freezer bag and freeze for as much as 3 months. Thaw at room temperature, then heat and re-crisp the crust utilizing the reheating methodology above.
Extra Common Do-it-yourself Bread Recipes
Watch Find out how to Make Do-it-yourself Ciabatta Bread:
When you make this ciabatta bread recipe and adore it, keep in mind to cease again and provides it a 5-star score – it helps others discover the recipe! ❤️️

Ciabatta Bread
This simple ciabatta bread recipe ends in stunning rustic loaves with a superbly chewy inside texture studded with splendidly massive air bubbles. It’s virtually begging to be dipped into your favourite soup or stew.
For the Sponge:
- 1 cup (130 g) all-purpose flour
- ⅛ teaspoon instantaneous yeast
- ½ cup (120 ml) water, at room temperature
For the Dough:
- 2 cups (260 g) all-purpose flour
- 1½ teaspoons salt
- ½ teaspoon instantaneous yeast
- ¾ cup (180 ml) water, at room temperature
- ¼ cup (60 ml) complete or 2% milk, at room temperature
-
Make the Sponge: Mix the 1 cup flour, ⅛ teaspoon yeast, and ½ cup water in a medium bowl and stir with a wood spoon till a uniform mass types. Cowl the bowl tightly with plastic wrap and let stand at room temperature for not less than 8 hours or as much as 24 hours.
-
Make the Dough: Place the sponge and the dough components (flour, salt, yeast, water and milk) within the bowl of a stand mixer fitted with the paddle attachment. Combine on low pace till mixed and a shaggy dough types, about 1 minute, scraping down the bowl and paddle as wanted. Enhance the pace to medium-low and proceed mixing till the dough turns into a uniform mass that collects on the paddle and pulls away from the perimeters of the bowl, 4 to six minutes.
-
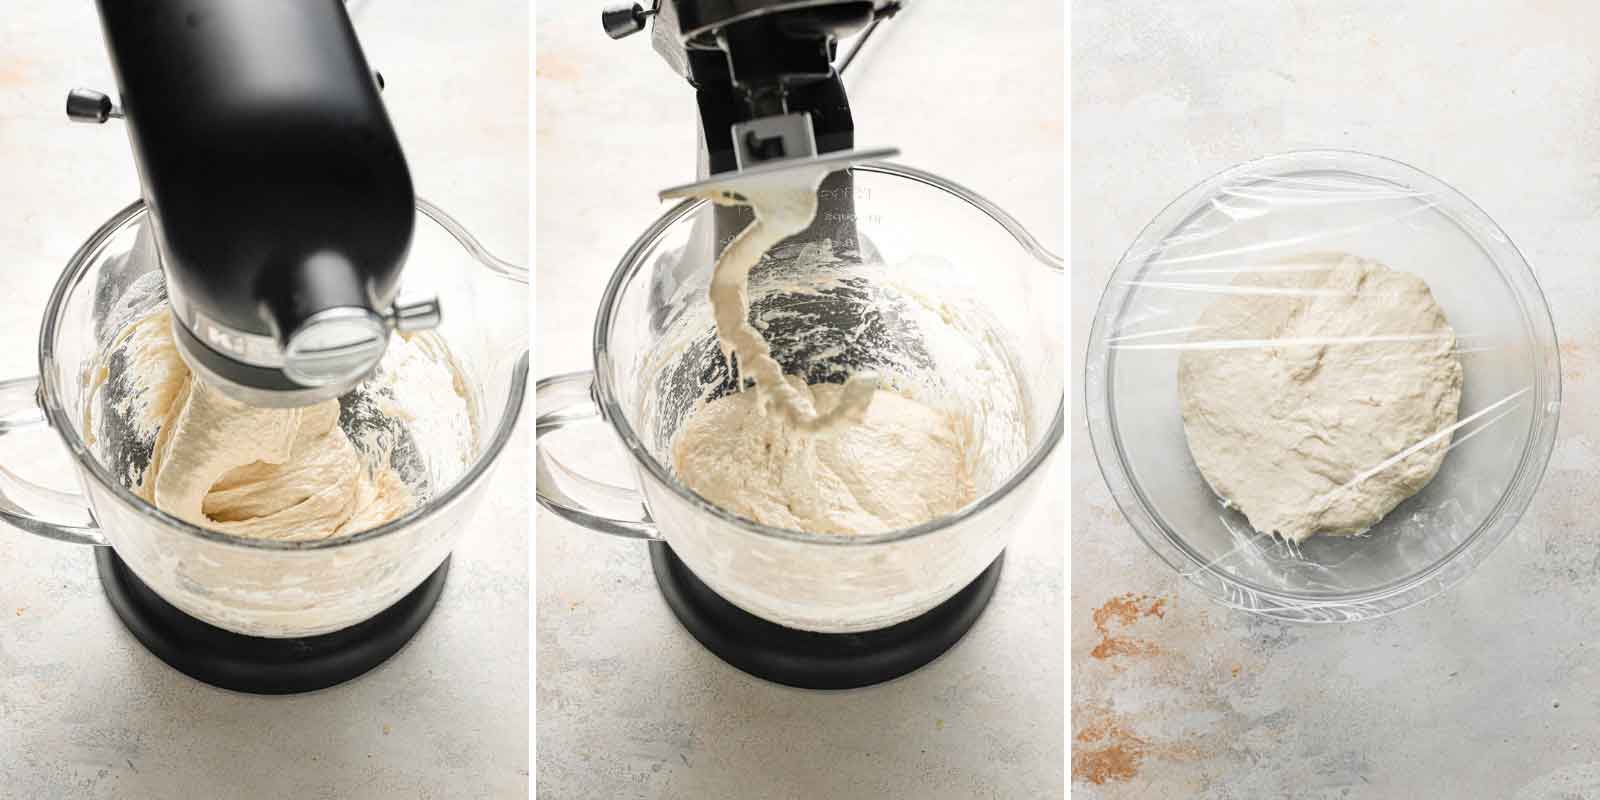
Change to the dough hook and knead the bread on medium pace till easy and glossy (the dough will probably be very sticky), about 10 minutes.
-
Switch the dough to a big bowl, cowl tightly with plastic wrap, and let rise at room temperature till doubled in measurement, about 1 hour.
-
Spray a rubber spatula or bowl scraper with non-stick cooking spray. Fold the dough over itself by gently lifting and folding the sting of the dough towards the center. Flip the bowl 90 levels, and fold once more. Flip the bowl and fold the dough 6 extra occasions (for a complete of 8 occasions).
-
Cowl with plastic wrap and let rise for half-hour.
-
Repeat the folding as in step #7, exchange the plastic wrap, and let rise till doubled in measurement, about half-hour.
-
One hour earlier than baking, alter an oven rack to the lower-middle place, place a baking stone on the rack and preheat the oven to 450 levels F.
-
Lower two 12×6-inch items of parchment paper and dirt liberally with flour. Switch the dough to a floured work floor, being cautious to not deflate it fully. Liberally flour the highest of the dough and divide it in half with a bench scraper. Flip 1 piece of dough cut-side-up and dirt with flour. With well-floured fingers, press the dough right into a tough 12×6-inch rectangle. Fold the shorter sides of the dough towards middle, overlapping them such as you would fold a letter in thirds, to kind a 7×4-inch rectangle. Repeat with the second piece of dough.
-
Gently switch every loaf, seam-side-down, to the parchment sheets, mud with flour, and canopy with plastic wrap. Let the loaves sit at room temperature for half-hour (the floor of the loaves will develop small bubbles).
-
Slide the parchment items with the loaves onto a pizza peel. Utilizing floured fingertips, evenly poke all the floor of every loaf to kind a ten×6-inch rectangle; spray the loaves flippantly with water. Slides the loaves and parchment onto the baking stone. Bake, spraying the loaves with water twice extra throughout the first 5 minutes of baking time, till the crust is deep golden brown and the loaves register 210 levels F, 22 to 27 minutes.
-
Switch the loaves to a wire rack, discard the parchment, and let cool to room temperature for not less than 1 hour earlier than slicing and serving. The bread may be wrapped in a double layer of plastic wrap and saved at room temperature for as much as 3 days. Wrapped with a further layer of foil, the bread may be frozen for as much as 1 month. To recrisp the crust, thaw the bread at room temperature (if frozen), and place unwrapped bread in 450-degree oven for six to eight minutes.
- Gear – To take advantage of this recipe, I like to recommend utilizing the next items of apparatus: stand mixer / bowl scraper / bench scraper / baking stone / parchment paper / pizza peel / spray bottle / digital instant-read thermometer / wire cooling rack
- Yeast – When you substitute lively yeast as an alternative of instantaneous yeast, you will want to remember to activate it in heat water first, as an alternative of merely mixing it with the flour and room temperature water.
- Milk – Complete milk is most popular, however 2% or 1% will also be used. You can even substitute 2 tablespoons of nonfat milk powder (improve water in dough to 1 cup).
- Stand Mixer – Because of the excessive hydration of this dough and the way sticky it’s, a stand mixer is necessary for having the ability to handle the dough correctly.
- Dealing with the Dough – Needless to say this dough may be very moist and sticky; the important thing to working it nicely is to take action shortly and gently. An excessive amount of heavy-handling of the dough will lead to flat, powerful loaves. Use a bowl scraper when doable and if you should use your fingers, make sure that they’re well-floured.
- Baking Stone – When you do not need a baking stone, you should use a baking sheet that’s turned upside on the bottom oven rack and preheated as directed.
- Making Ciabatta Rolls – To make rolls, use a bench scrape to divide every loaf into 6 or 8 even-sized parts. Separate them a bit on the parchment sheet in order that they aren’t touching.
- Storage – The bread may be stored at room temperature, wrapped in foil, for as much as 2 days.
- To Reheat the Bread – Hold it wrapped in foil and place in a 450-degree oven for six to eight minutes.
- Freezing the Bread – Wrap tightly in foil, then place in a ziploc freezer bag and freeze for as much as 3 months. Thaw at room temperature, then heat and re-crisp the crust utilizing the reheating methodology above.
- Recipe from Baking Illustrated
Dietary values are primarily based on one serving
Energy: 79kcal, Carbohydrates: 16g, Protein: 2g, Sodium: 196mg, Potassium: 29mg, Vitamin A: 5IU, Calcium: 7mg, Iron: 1mg
This recipe was initially revealed in March 2014.
Pictures by Dee Frances.